[v2.0] Tutorial 2 - Triggers, Enhancing our Simple Mission.
[07-oct-2012]
- fixed "fail_can_cont="1" to "fail_can_continue="1"
- fixed "onEnter" syntax
Welcome to Tutorial No.2.The following tutorial will enhance some of the aspects done on the first tutorial, while introducing alternatives approaches to some of the topics we discussed on tutorial one.
The tutorial will cover the following topics:
The tutorial will cover the following topics:
- Triggers element - Introduction
- Trigger types and rules - which one to choose
- Gathering info regarding the trigger area.
- Defining a trigger in the mission data file
- Basic Events in triggers
- Implementing a trigger in our "Simple Mission" from tutorial one.
- Test + Exercise
- Trigger as a Target
- Implement the feature in our Simple Mission
- Test again
- Finishing Words
Triggers
Triggers are events that are bind into a zone/area or are bind to a logical rule. When a trigger is bound to a zone, we need to decide whether the boundaries are based on a radius or polygonal area/zone.
Using triggers, basically, give you a more versatile way to handle the mission events but you need to remember few guiding rules:
These characteristics allow a lot of flexibility when designing a mission and its goals.
Using triggers, basically, give you a more versatile way to handle the mission events but you need to remember few guiding rules:
- Triggers are part of a "step" and not defined globally as a mission event.
- Triggers allow us to fire events.
- Some events are pre-defined by the plugin, like: "onEnter", "onLeave", "onSuccess", "onFail" and "onHit".
- You can define new event names, but do not use the pre-define ones. These events can be also called from "Logic" elements (not in this scope).
- A target that is linked (grouped to) a trigger, will be accomplish only if simmer adhere to "all" of the trigger rules.
These characteristics allow a lot of flexibility when designing a mission and its goals.
What are the types of triggers and which one to choose
There are two main trigger types, those that are based on coordination (trigger_zone) and those that are based on "dataref" values (logic).
In this tutorial we will concentrate first on the "trigger_zone" event.
Trigger_zone id divided and mixed to different types and rules.
Types are: radius, polygonal and slope.
Rules are: enter, timer, hit, timer to stay or restrict and bound. The rules also define the default event that will be fired when it is met by the simmer.
As designer you can define a trigger that is of type "rad" (radius) with rule: "enter" ( will fire the "on_enter" event).
In our tutorial we will use the polygonal area type, in order to practice it and not because it is better or more adequate to our mission.
Next, we need to decide which event to use. In this tutorial we will replace the <Feedback> that we implemented, just after crossing LOIK airport, with a triggering zone. That means, we need a zone that will trigger an event and send a message to the simmer when he/she enters that area.
Now that we know which action we want to trigger, we can now define which event will handle the triggering action (rule). In this case, we need an "on_enter" event ( we can also use "on_success" but it can be confusing )
To sum it up:
We will create a triggering zone with type="poly" its action rule="enter" and the <event> handler will be "on_enter".
Our next goal will be to prepare the trigger zone info, and handle the event using the Mission Data syntax.
Gathering info regarding the triggering area
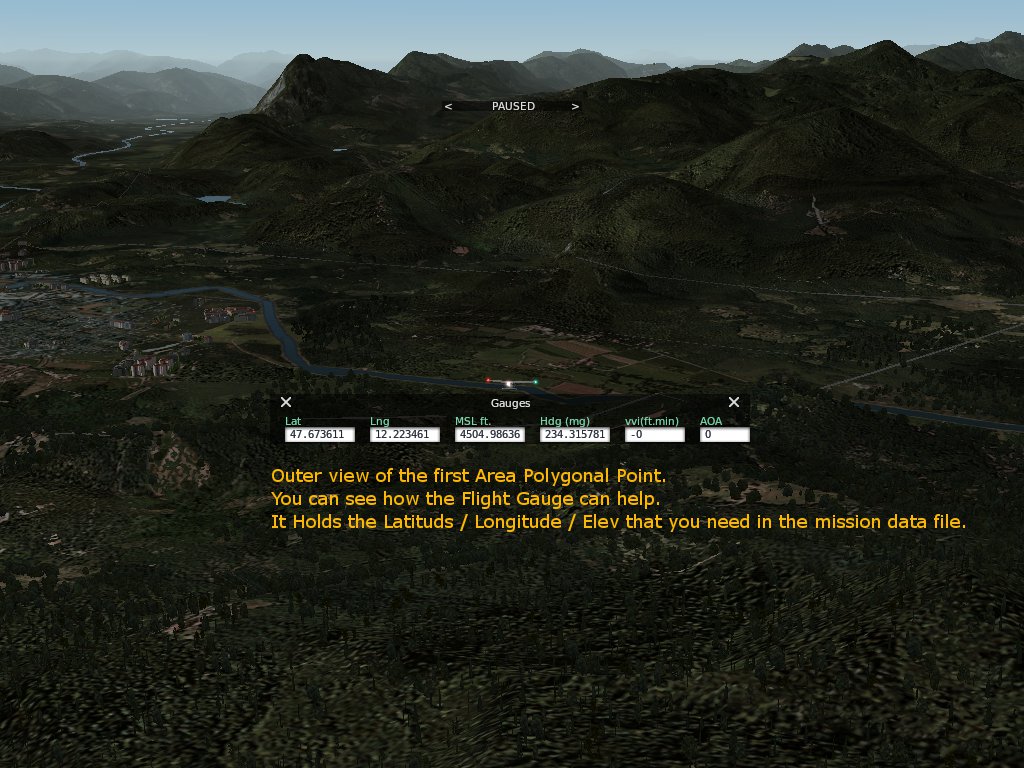
Since we are using a polygonal area, we need to define at list three coordinates that will define the area. We can do it quite easily using the "Flight Gauge" ( You should tick the "designer" option under the "option widget" in order to see higher precision under the "Flight Gauge").
Here is my 50 cents on how to use it:
Here is a simple visual example:
Here is my 50 cents on how to use it:
- Load X-Plane.
- Move plane to LOIK airport.
- Click the "Flight Gauge" sub menu (or bind it to a key command)
- Enter "Local Map" screen.
- Move plane on map to the location you need to fetch coordinate.
- Exit Local Map view, and write down the coordinate.
- Repeat this process for all locations.
Here is a simple visual example:
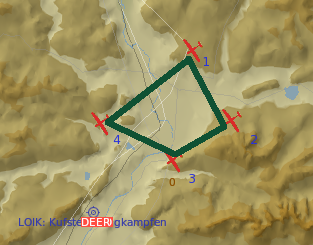
From the image, you can see that I have defined four locations that represent the triggering area. We need to extract the coordination and write them down in clockwise order:
- 47.673611 / 12.223461
- 47.621880 / 12.256681
- 47.597233 / 12.203191
- 47.619671 / 12.134592
Defining "trigger_zone" in the mission data file
Before modifying any mission file, we should back it up first.
Now we can do the following:
Here is a snippet of the Areas element
Now we can do the following:
- Edit Tutorial01_mission.xml file ( or any name you gave it )
- Add a new <triggers> element and a new <trigger_zone> sub element that will hold the triggering rules.
- Remove the old feedback and the optional objective we created in Tutorial 1.
Here is a snippet of the Areas element
<triggers>
<trigger_zone type="poly" rule="enter" fail_can_continue="1" group_id="" is_enabled="1">
<trigger_rules>
<point lat="47.673611" long="12.223461" />
<point lat="47.621880" long="12.256681" />
<point lat="47.597233" long="12.203191" />
<point lat="47.619671" long="12.134592" />
</trigger_rules>
<event....>
</trigger_zone>
</triggers>
You can define multiple trigger_zone sub elements under the "triggers" element in each step.
The must have attributes to set under the "trigger_zone" are the "type" and "rule" attributes.
Since we define "poly" area, we need to add at least three <point> elements that define the area boundaries. Each point represent one coordinate [ lat | long ] , gathered in previous step.
Our "trigger_zone" definition is almost complete, we still need to define the <event> ( action ) to take place once the plane has entered the triggering area.
For that lets do a short refresh about events.
Events
"event" element represent the action the plugin should conduct once a waiting trigger has been triggered. In our case when the plane enters a trigger_zone. The event is a complimentary element, meaning, it needs to be encapsulated under other element (parent element).
In this tutorial, our event will be "on_enter".
Under the <event> element, we can define few actions but none of them is mandatory.
The actions are:
- Send feedback to the simmer
- Trigger "active_feedback" ( see designer guide for more explanation )
- Apply logic (not discussed on this tutorial)
- Apply Inventory Actions (not discussed on this tutorial)
Since we want to send a message to our simmer, we will just define the <msg> element under our Event.
It should be something as follow:
<event id="1" name="onEnter" >
<msg><![CDATA[Remember to follow the river north]]></msg>
</event>
<msg><![CDATA[Remember to follow the river north]]></msg>
</event>
We need to copy and paste what we have done into the second "step" and then clean the old Feedback and the Optional target we created just for it.
Here is an example:
Here is an example:
<!-- Second Step: Land at EDNV airport -->
<step id="2" name="ednv" next_step="end" >
<step_goals>
<static_target id="1" name="" lat="47.945999" long="12.204670" elev_ft="1539" need_to_land="1" success_distance_nm="0.8" success_elev_relative_ft="0" />
<!-- end of valley -->
<static_target id="3" name="" lat="47.564991" long="12.127969" elev_ft="3000" need_to_land="0" success_distance_nm="0.8" success_elev_relative_ft="5000" optional="1" />
</step_goals>
<step_settings>
<step_desc>
<![CDATA[Continue eastwards from LOIK airport, and follow the river north until you reach the end of the valley.;Once there, head to EDNV airport and land there to complete the flight plan.;;Good Luck;]]>
</step_desc>
</step_settings>
<step_feedbacks>
<broadcast id="2" target_id="3" distance_to_broadcast="3" ><![CDATA[You are nearing the end of the valley. Remember to head ~4 degrees to reach EDNV airfield.;You can use the local map too.;]]></broadcast>
<broadcast id="3" target_id="1" distance_to_broadcast="8" ><![CDATA[You are nearing EDNV airfield;]]></broadcast>
</step_feedbacks>
<triggers>
<trigger_zone type="poly" rule="enter" fail_can_continue="1" >
<trigger_rules>
<point lat="47.673611" long="12.223461" />
<point lat="47.621880" long="12.256681" />
<point lat="47.597233" long="12.203191" />
<point lat="47.619671" long="12.134592" />
</trigger_rules>
<event id="1" name="on_enter" >
<msg><![CDATA[Remember to follow the river north]]></msg>
</event>
</trigger_zone>
</triggers>
</step>
Our second "step" has now the <triggers> element and you can see I removed <static_target id="2".../> and <broadcast id="1" target_id="2" ../> since they are no more needed.
The trigger_zone is self-contained; it is like a target with inner rules and actions management.
Another thing we can see is that adding more features can make step code more complex.
Try to keep your mission data file as clean and indent as possible, that way it will be easier to spot what you look for. This is why I try to use good editors that help me distinguish between relevant and irrelevant info.
Our First mission enhancement is complete.
Load X-Plane, and test the modified objective.
----- Need to upload the new example -----
Load X-Plane, and test the modified objective.
----- Need to upload the new example -----
Short Exercise:
After testing our first "enhancement" with "trigger_zone" and "event" elements, lets try to create a rule that will be govern by a trigger_zone.
On the first tutorial, we asked the simmer to fly over the valley and cruise at level no more then 6000 feet until he/she reaches LOIK airport. We did not restricted or inform the simmer that he is not in the correct area/level and now it is a good opportunity to implement this.
It is important to understand that there might be more then one way to achieve these tasks but on the suggested implementation I'll use only one solution.
Task One: Inform the simmer that he/she is not flying in the correct route. It's enough that the feedback will be sent only once.
Task Two: Modify the trigger, so it will send the restriction message when the plane is not in the correct elevation. We can describe this as: "if plane not in area coordination or plane in area but not in defined elevation then send message: Not in area or cruising level"
Start by implementing Task One, and then add Task Two.
In order to accomplish this, use the Designer Guide.
I'll publish my suggested solution at the end of this tutorial
triggers as Target
In some cases, you will want that an area will be the "target", hence it will represent as a target.
In order to reach this goal, we need to link between a target and an area (trigger_zone). The link is done by attribute "group_id".
Here are the steps to define area as target:
In our case, we will convert "step" two "static_target" to an "area_target". This is for the sake of practice.
We will use a trigger_zone type "rad" (radius) same as the static target, and copy relevant info from it.
Here is an example of how it should look:
In order to reach this goal, we need to link between a target and an area (trigger_zone). The link is done by attribute "group_id".
Here are the steps to define area as target:
- Define <trigger_zone> element if not defined yet.
- Give it a unique group_id number.
- Define <area_target> element under <step_goals>. Its group_id should be the same as the "trigger_zone" "group_id".
In our case, we will convert "step" two "static_target" to an "area_target". This is for the sake of practice.
We will use a trigger_zone type "rad" (radius) same as the static target, and copy relevant info from it.
Here is an example of how it should look:
<!-- Second Step: Land at EDNV airport -->
<step id="2" name="ednv" next_step="end" >
<step_goals>
<area_target id="1" name="area_1" group_id="100" need_to_land="1" />
<!-- end of valley -->
<static_target id="3" name="" lat="47.564991" long="12.127969" elev="3000" needToLand="0" success_distance_nm="0.8" success_elev_relative_ft="5000" optional="1" />
</step_goals>
<step_settings>
<step_desc>
<![CDATA[Continue eastwards from LOIK airport, and follow the river north until you reach the end of the valley.;Once there, head to EDNV airport and land there to complete the flight plan.;;Good Luck;]]>
</step_desc>
</step_settings>
<step_feedbacks>
<broadcast id="2" target_id="3" distance_to_broadcast="3" ><![CDATA[You are nearing the end of the valley. Remember to head ~4 degrees to reach EDNV airfield.;You can use the local map too.;]]></broadcast>
<broadcast id="3" target_id="1" distance_to_broadcast="8" ><![CDATA[You are nearing EDNV airfield;]]></broadcast>
</step_feedbacks>
<triggers>
<trigger_zone type="rad" rule="enter" fail_can_continue="1" >
<trigger_rules>
<point lat="47.673611" long="12.223461" />
<point lat="47.621880" long="12.256681" />
<point lat="47.597233" long="12.203191" />
<point lat="47.619671" long="12.134592" />
</trigger_rules>
<event id="1" name="on_enter" >
<msg><![CDATA[Remember to follow the river north]]></msg>
</event>
</trigger_zone>
<trigger_zone type="rad" rule="enter" fail_can_continue="1" group_id="100" >
<trigger_rules>
<point lat="47.945999" long="12.204670" />
<radius length_nm="0.8"/>
</trigger_rules>
<event id="1" name="onEnter">
<msg><![CDATA[Congratulations, You made it to EDNV in one piece.]]></msg>
</event>
</trigger_zone>
</triggers>
</step>
Read carefully the suggested code above. Pay attention to the "red" highlighted text.
I'll do a quick explanation of what was done.
In this example, I kept the new trigger_zone definitions same as the original static_target to simulate exact behavior.
Test the solution in X-Plane.
I'll do a quick explanation of what was done.
- First: I have modified the static_target to area_target. The lat/long/elev are not relevant in it, since it will inherit the location from trigger_zone.
The attributes that passes from area_target to trigger_zone are: "id", "need_to_land", "success_distance_nm, "success_elev_relative_ft" and "name". - Second: I defined a group_id. The group_id, will link between the area_target and the trigger_zone.
- Third: I added a new area_zone (under areas) with: type="rad, rule="enter" and group_id={same as area_target group_id}.
- Fourth: [important] You should define an event that will notify the simmer that target was achieved. Without the Event message the simmer might not notice he/she accomplished the objective of the step or reached the target. I define the "onEnter" event.
In this example, I kept the new trigger_zone definitions same as the original static_target to simulate exact behavior.
Test the solution in X-Plane.
Proposed Solutions for Exercise:
You can navigate to the "solution page" and see the solutions suggestions.
Please update me for any issues.
Please update me for any issues.
Finishing Words:
The <triggers> element is one of the more important and flexible component that you should be aware of. Triggers helps simulate an event/respond mechanism in the plugin, and in future it will probably have more options embedded into it.
Hope this tutorial helped and made it easier to understand how <trigger_zone> element can enhance your missions. In upcoming tutorials we will return to <triggers> and meet the other trigger type, "trigger_logic"
( If you find mistakes, any kind, please kindly e-mail it to my mailbox )
Snagar
