[v2.0] Tutorial 01 - The Basics
A step by step tutorial to create a simple mission
[07-oct-2012] Fixed few snippets in the tutorial. Some elements were not v2.00 compliant. Sorry for the incontinent.
[08-feb-2014] Fixed some typo, and changed the name of the first step to: "first" instead of "start". Your starting point is the "briefer" so it is less confusing.
[08-feb-2014] Fixed some typo, and changed the name of the first step to: "first" instead of "start". Your starting point is the "briefer" so it is less confusing.
Hello,
The intro tutorial was copied and modified from v1.20 tutorials.
The tutorial will discuss how to create a simple mission, the basic assumption is that you read or have the designer guide in order to get more detail info ( if needed ).
The tutorial will cover the following topics:
The intro tutorial was copied and modified from v1.20 tutorials.
The tutorial will discuss how to create a simple mission, the basic assumption is that you read or have the designer guide in order to get more detail info ( if needed ).
The tutorial will cover the following topics:
- Scenario Draft ( story line ).
- Gather info.
- Test Locations in X-Plane.
- Write the Scenario as a set of instructions.
- Check if the Mission-X plugin can execute all instruction as intended.
- Write Basic mission-file.
- Test.
Scenario Draft
The first step for any mission creation is to decide on the story line. It can be a simple short scenario or complex with accuracy in mind.
I for instance, prefer the fun factor but if I can find a flight plan that can help newbies or veterans to practice an element of flight then I'll try to convert it to the Mission-X plugin.
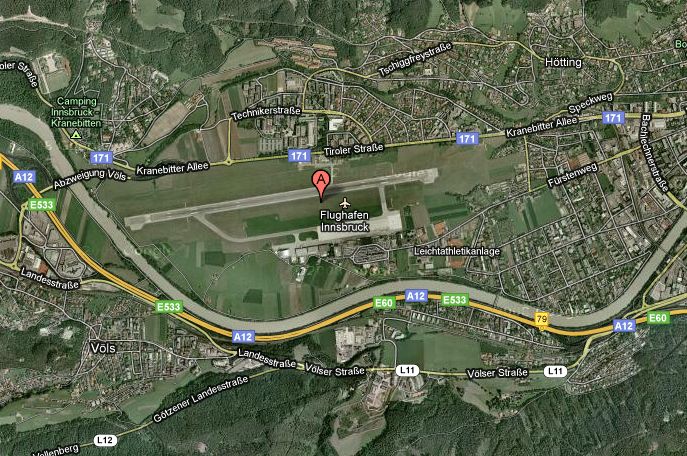
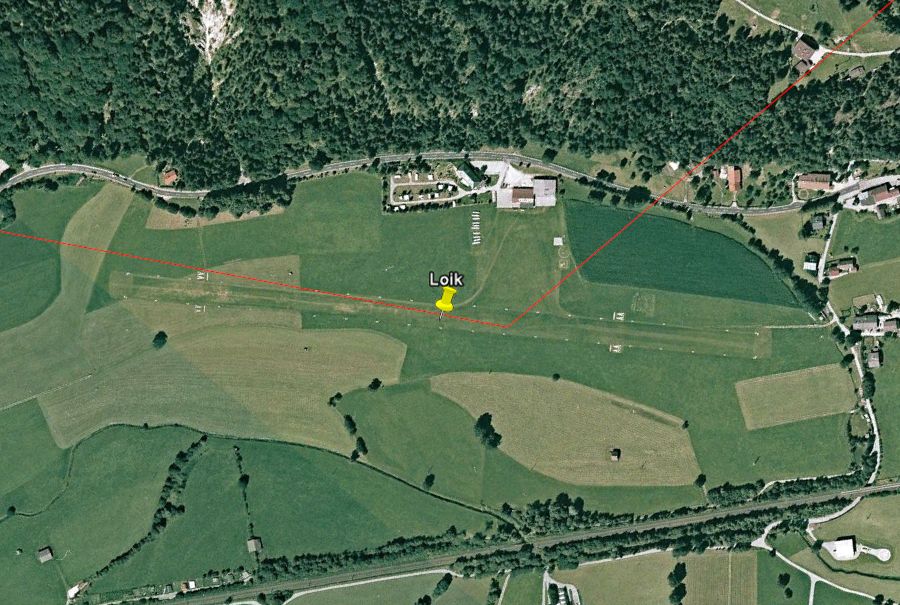
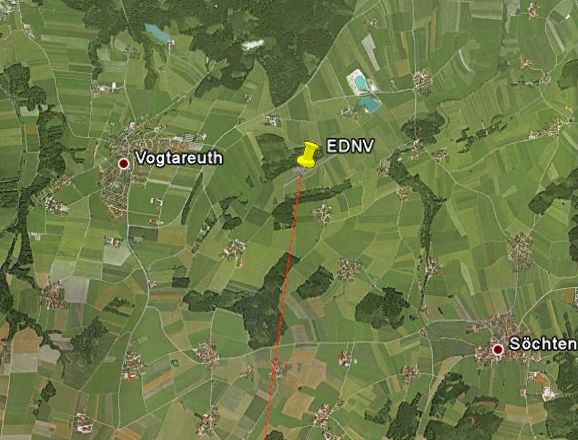
In the current tutorial, we will design a simple mission on an area that everyone should have on their XP9. We will start at LOWI airport, and search for other airports or locations that will participate in this short trip.
I for instance, prefer the fun factor but if I can find a flight plan that can help newbies or veterans to practice an element of flight then I'll try to convert it to the Mission-X plugin.
In the current tutorial, we will design a simple mission on an area that everyone should have on their XP9. We will start at LOWI airport, and search for other airports or locations that will participate in this short trip.
Gathering Info
First we will search for a route. We can use the local map view in X-Plane or Google Maps or other means.
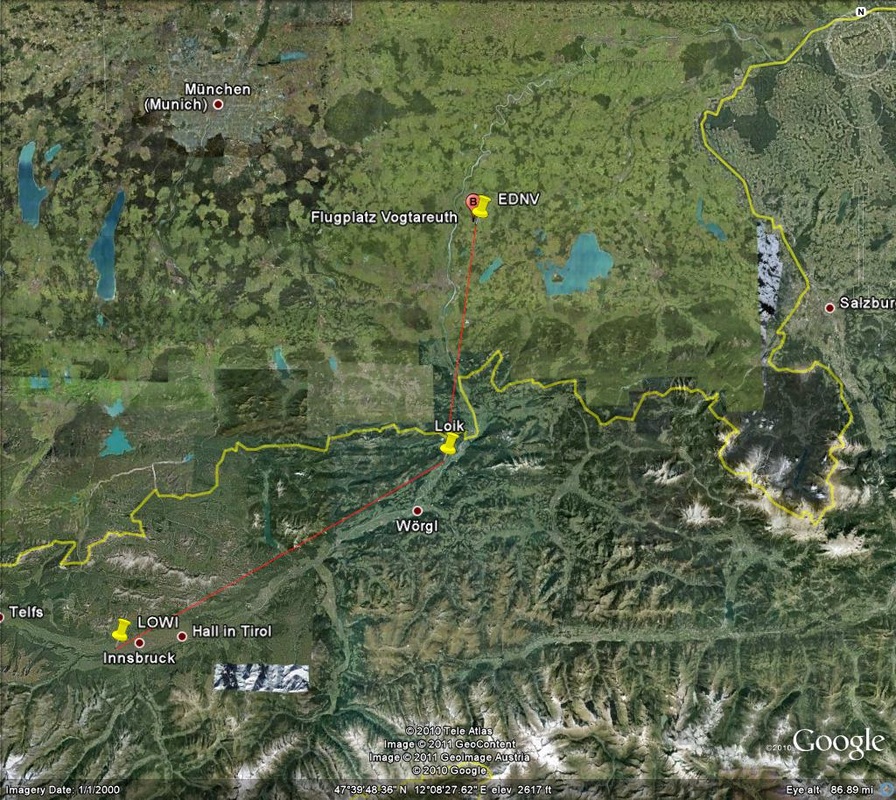
Proposal route
We can see that the route is a simple one. It is along the length of a valley, We can use the topography to direct the simmer to fly along it.
Our route description, should look like the following: Start at LOWI airport head 60 deg, pass the LOIK airport and continue with the valley north to EDNV airport.
The length of the route is ~60nm, more or less, and it is suited for a prop airplane.
Our route description, should look like the following: Start at LOWI airport head 60 deg, pass the LOIK airport and continue with the valley north to EDNV airport.
The length of the route is ~60nm, more or less, and it is suited for a prop airplane.
Test Locations in X-Plane
Not everything in x-plane scenery is perfect, to say the least. I mean, there are places with good detail and more or less accurate environment, but then again there are places where you just scratch your head in puzzlement thinking "what the heck were they thinking" or "How this thing has arrived here"..... you get the idea.
In this step, we will first check the locations in X-Plane just to see if the area and airports are satisfying in their quality.
If we are not satisfied then we can search the internet for custom scenarios or make our own modifications/scenarios.
Here are some images of the airports locations we just defined in the suggested route. The images are from x-plane and google maps.
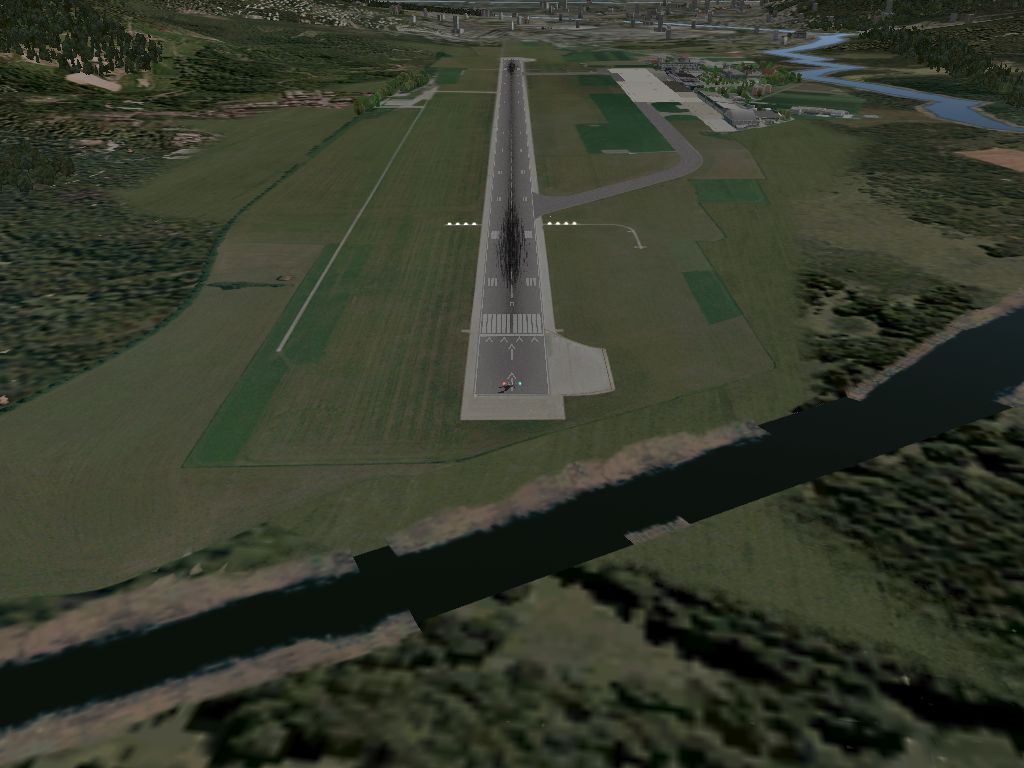
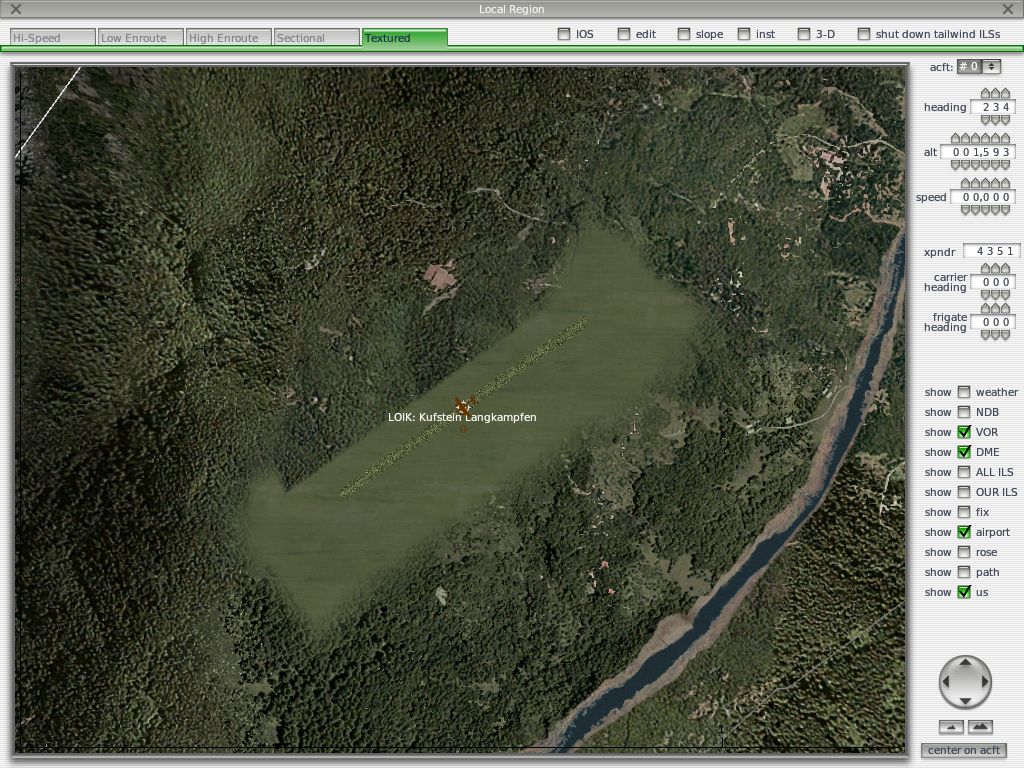
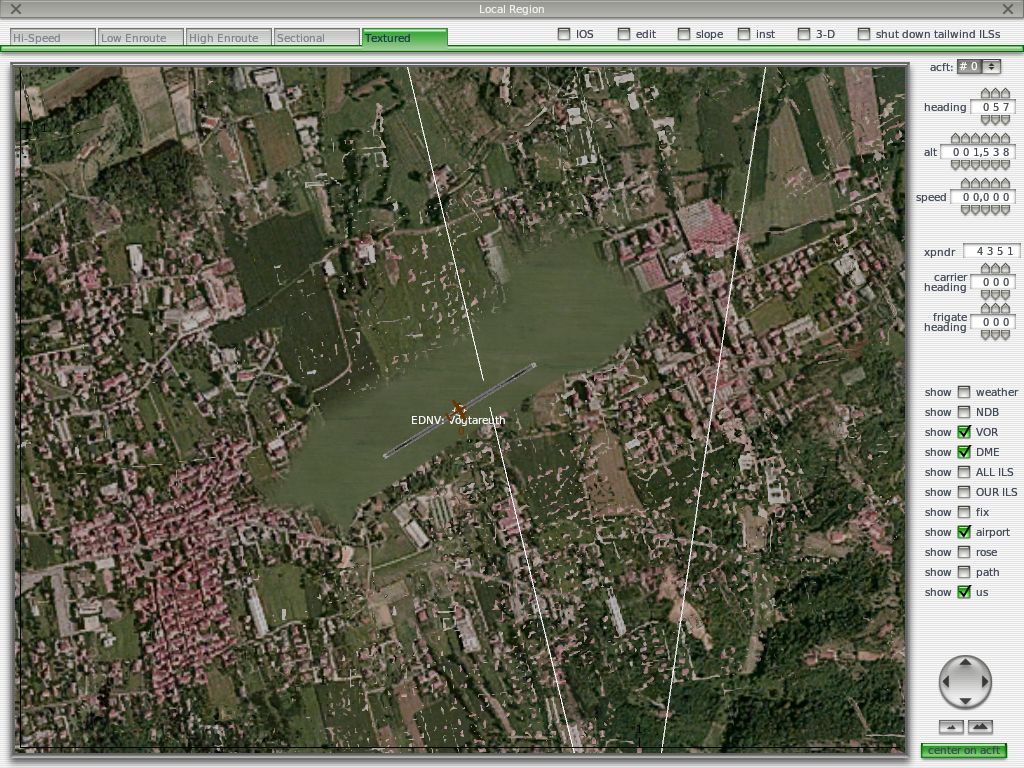
The image gallery of the locations, shows the difference between x-plane and the real thing. We can easily locate staggering differences between the real locations images and the ones from X-Plane 9, it is much better on X-Plane 10 though. This is why the option of making our own custom scenery to some of the airports or at least search for custom scenarios for them doesn't seem that bad idea anymore.
Write the Scenario as a set of instructions
The simplest or complex of mission, should be converted to a set of instructions that we can later write down in our mission data file.
Here is an example of our route as a set of instructions:
That was a simple exercise of extracting our suggested route into steps. we can also vision the flight, and it also look/sound coherent on paper.
We are ready to start and write our mission in a file, but first we should consult the Designer Guide if the plugin holds enough features to allow us to write such a mission. In our case the answer is yes. this is why we will Skip the step of: "Check if the Mission-X plugin can execute all instruction as intended"
Here is an example of our route as a set of instructions:
- Take off from LOWI airport - Starting Location
- Fly east heading ~70 deg over the valley until you reach LOIK airport.
- Continue with the valley until the river starts to bend North, heading ~334 deg.
- Once you are out of the valley and mountains area, head ~4 deg until you reach EDNV.
You can use the local map for orientation. - Land in EDNV airport - Mission Ends.
That was a simple exercise of extracting our suggested route into steps. we can also vision the flight, and it also look/sound coherent on paper.
We are ready to start and write our mission in a file, but first we should consult the Designer Guide if the plugin holds enough features to allow us to write such a mission. In our case the answer is yes. this is why we will Skip the step of: "Check if the Mission-X plugin can execute all instruction as intended"
Write Basic mission-file
If you read my first post: "First Steps to write your own Mission File" you are already aware that the mission file is based on XML rules, and the mission file itself is divided into sections that represents the whole mission.
The sections we will define are:
In each section there might be sub sections, but we will get there in a minute.
The sections we will define are:
- Header
- Briefer
- Steps or Objectives
In each section there might be sub sections, but we will get there in a minute.
Header:
First we define the Missions Header.
The element <MISSION> will define the missions version and compatibility, name, and title name.
The name will effect the "save/load" file name, and the title will be displayed on the Mission Briefer Window.
First we define the Missions Header.
The element <MISSION> will define the missions version and compatibility, name, and title name.
The name will effect the "save/load" file name, and the title will be displayed on the Mission Briefer Window.
<?xml version="1.0" encoding="utf-8"?>
<MISSION version="200" name="Tutorial_v200" title="Tutorial 01 - Simple Mission Creation" >
<header copyright="snagar"/>
<global_settings>
<start_time days="230" hours="9" min="0" sec="0" />
<dir custom_dir="missionx_tutorials" sound="" />
<map file_name="tutorial01Map.bmp" width="606" height="581" />
</global_settings>
About <global_settings> Element: It is always good to define Time of the mission and add an image that represent the path/area of the mission. If you read the Designer guide, you already know that you can define different map to each "step", so the global_settings map is relevant if there is no map defined under a "step". Think of it as a default map, or fallback option.
The map element uses the "custom_dir" directory to construct the path where the images will be stored
{X-Plane Dir}/Custom Scenery/missionx/{custom_dir}.
It is important to remember that image file names are case sensitive in some OSes.
Width and Height should represent the real image size you want to display. It should be no more then 1024x512. ( see the designer guide for more info)
In our mission, we define a starting date:
230 days since January the 1st, Nine o'clock GMT/UTC time (It will be a day mission in some parts of the world, so you will always need to verify local time and modify the clock accordingly).
Our next Element will be the briefer.
Briefer
The briefer is the "Prologue" of the mission.
The information in the briefer should contain sufficient info regarding the Mission's objectives (leaving special events behind), the type of plane we recommend, how to set weather and time of mission, are there any special rendering rules etc...
Apart from the mission description, we also define in the briefer, the starting location of the mission. We should define an ICAO as our starting point, and if needed, we can adjust the location coordinate which need to be in the ICAO area.
Here is a snippet of our tutorial mission:
<briefer lat="47.260227" long="11.343968" elev_ft="1909.8" icao="LOWI" location_adjust="0" >
<desc><![CDATA[Welcome to Tutorial No. 1;;In this tutorial we are going to fly from LOWI airport, cruising east at 5000 feet until we reach LOIK airport as our first checkpoint;;From LOIK we will continue with the river north until we leave the valley. Once we are outside the Valley, navigate to EDNV airport.;;Special Directives:;===========;;*Cruise no more then 6000 feet.;*Fly along the valley, do not ascend above the mountains ridges.;;X-Plane Settings:;=======;;Turn of METAR, under weather settings.;;____;Enjoy your flight;;Snagar]]></desc>
</briefer>
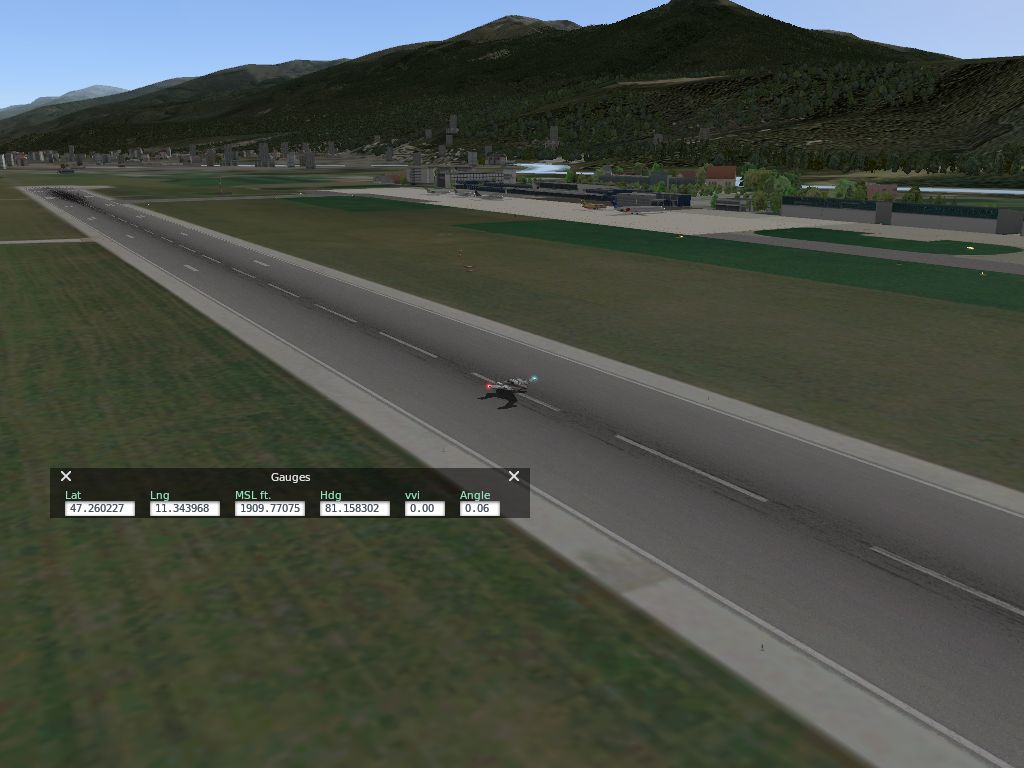
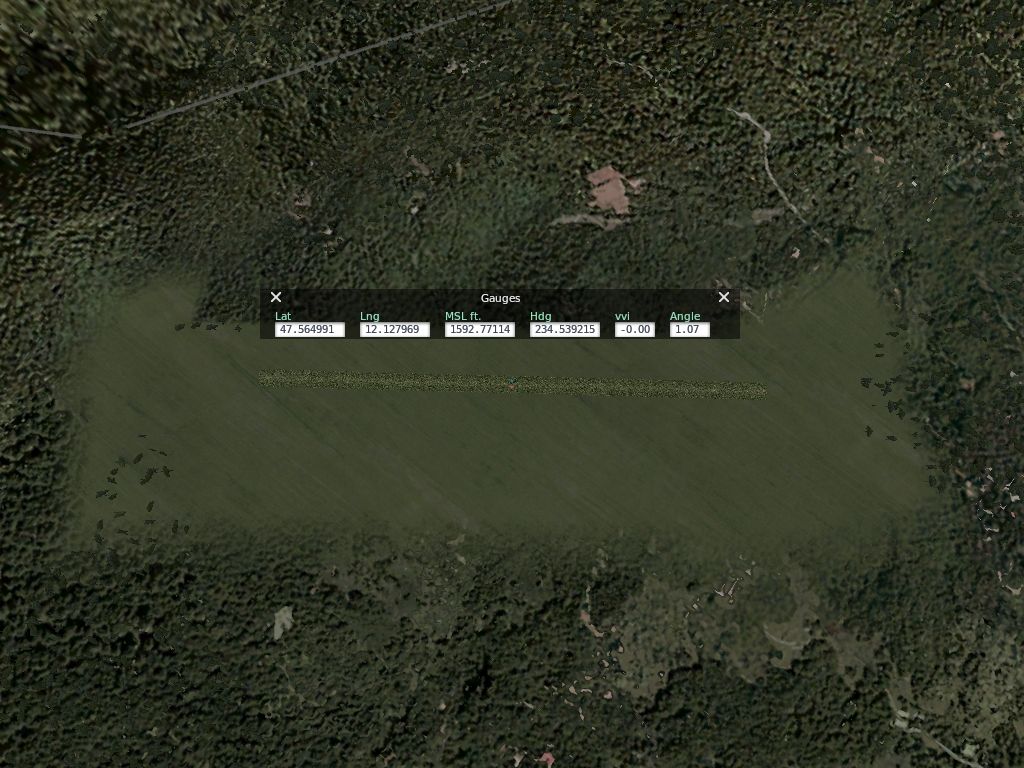
In this example the ICAO will be LOWI.We do not need location adjustment, but it is a good practice to fill in the Lat,Long and elev attributes of the starting location. For that I use the "Flight Gauge", located under the mission-x menu.
If you are using the designer option, the "Flight Gauge" will display a more accurate values of the plane coordination. So all you need is to move your plane to the starting location, open the "Flight Gauge" and copy the values under: lat/long/elev fields.
Use this technique in any place you need exact location.
The second part of the Briefer element, is the mission's description. Write down as much information as you can regarding the mission. The ";" character, means "new line".
Once we define the Briefer, it is time to fill in the mission "steps".
From the instructions we just made, we can see that the first step of the mission has already been defined by the Briefer, meaning the "Starting Location".
We now need to decide what will represent the first, second... etc steps (or objectives).
In missionx v2.0, we must define two steps with the names "start" and "end" that defines the first "step" and the ending description.
In our tutorial we have two "steps"
first: pass over LOIK airport ( the following step will be named "start", since it is the first one. You can use "title" attribute to give it a different descrition).
second: land in EDNV (the following step will be named "enov" for the ICAO name).
That was simple, but our storyline describes a change in course. Our route heading changes as follow:
First heading Change: once we pass the LOKI airfield.
Second Change: Once we fly out of the valley and leave the mountains ridges.
For that we need a means to inform the pilot that it is about time to change course to the new heading, this way the simmer will know that he/she is on track. This is an optional information the designer can decide he/she wants to implement or not.
In the tutorial, we will add two feedback regarding the heading changes, but it is possible that the simmer will miss them if he choose other path then the one planed for him.The only way we can restrict the simmer, for now, is to create a "step" that the simmer must accomplish, and the message will be embedded in it. This is a designer decision.
Now that we decided what should be incorporate in the mission file, lets start and define the STEPS.
Bug found: until missionx v2.1.0 a20 you should replace "weight_kg" with "weight". From v2.1.0 a23, both options would be supported, but please use "weight_kg" in the future.
<steps>
<!-- First step: Fly over LOIK airport -->
<step id="1" name="first" title="loik" next_step="ednv" >
<step_goals>
<static_target id="1" lat="47.564991" long="12.127969" elev_ft="3000" need_to_land="0" success_distance_nm="1"
success_elev_relative_ft="3000" />
</step_goals>
<step_settings>
<step_desc>
<![CDATA[Take off from LOWI airport, and fly east about ~70 degrees;You should fly over LOIK airport while your elevation do not exceed 6000 when you pass it;]]>
</step_desc>
<payload id="1" weight_kg="16" operation="0" is_total="1" is_percent="1" />
<fuel id="1" weight_kg="50" operation="0" is_total="1" is_percent="1" />
<fuel id="2" weight_kg="50" operation="0" is_total="1" is_percent="1" />
<weather id="1" lat="47.260227" long="11.343968" use_real_weather="0">
<weather_zone id="1" outer_bounds_nm="2" inner_bounds_nm="0" vis_in_meters="15000" rate_of_weather_change="0.0" rain_pct="0.0" thunder_storm_pct="0" >
<cloud layer="0" type="0" cloud_base_ft="7900" cloud_tops_ft="7900" />
<cloud layer="1" type="0" cloud_base_ft="12000" cloud_tops_ft="12000" />
<cloud layer="2" type="0" cloud_base_ft="20000" cloud_tops_ft="20000" />
</weather_zone>
</weather>
</step_settings>
</step>
Lets take a closer look at the first "step" we just wrote.
First: our objective has one "static target". The target coordinate were taken from x-plane using the "Flight Gauge" ( see the gallery images ).
The location I chose, is the middle of the runway at LOIK. Since we do not want our simmer to land, we need to define the radius of success and the elevation the plane needs to be in order for the "step" to be accomplished. For that, we have defined two important things:
One: the "step" target is set at elevation of 3000ft and not on ground.
Second: we filled in the attributes: need_to_land="0", success_distance_nm="1" and success_elev_relative_ft="3000" which defines the additional rules for target success.
In this objective, the simmer needs to be in 1nm radius from the targets coordinate but also in elevation that will not exceed the targets elevation + radius elevation area (imaging a cylinder around the target location), which interpreted to: 3000ft(above) + 3000ft(below) = 6000ft(overall height). The simmer needs to be in elevation between 0ft to 6000ft.
The success_elev_relative_ft attribute is calculated as the radius of the center which represented as the targets elevation. This is a simple way to calculate area of success.
To sum it up, for finishing the first step successfully the simmers plane needs to be in:
Only if all these three rules will take place the "step" will succeed and the mission will move on to the next step.
There are other things that we can define under the "step" element, and I strongly encourage you to do so for the sake of consistency:
Fuel: we defined the fuel capacity for each tank. We define the total fuel as 50% percentage of the max allowed fuel in each tank.
Payload: we define the payload as 16% percentage of the total allowed payload.
Weather: Using the weather element, we defined a calm weather. Clear skies, no wind, rain or turbulence. We define the center of the weather area to be on same coordinates as our starting point, that way it will take effect immediately on start of the mission.
As of this writing on XP10.10b6 the "cloud layer 0" does not behave as expected (See weather in the designer guide).
To conclude the first "step", we have defined the first "goal" the simmer needs to reach, the scenario in which the simmer will fly- weather and payload. Now, we can move to the next "step" and the last one too, which asks the simmer to land on EDNV airport.
First: our objective has one "static target". The target coordinate were taken from x-plane using the "Flight Gauge" ( see the gallery images ).
The location I chose, is the middle of the runway at LOIK. Since we do not want our simmer to land, we need to define the radius of success and the elevation the plane needs to be in order for the "step" to be accomplished. For that, we have defined two important things:
One: the "step" target is set at elevation of 3000ft and not on ground.
Second: we filled in the attributes: need_to_land="0", success_distance_nm="1" and success_elev_relative_ft="3000" which defines the additional rules for target success.
In this objective, the simmer needs to be in 1nm radius from the targets coordinate but also in elevation that will not exceed the targets elevation + radius elevation area (imaging a cylinder around the target location), which interpreted to: 3000ft(above) + 3000ft(below) = 6000ft(overall height). The simmer needs to be in elevation between 0ft to 6000ft.
The success_elev_relative_ft attribute is calculated as the radius of the center which represented as the targets elevation. This is a simple way to calculate area of success.
To sum it up, for finishing the first step successfully the simmers plane needs to be in:
- the air.
- 1nm radius from the "static target" location and in
- elevation 3000ft above or bellow elevation target !
Only if all these three rules will take place the "step" will succeed and the mission will move on to the next step.
There are other things that we can define under the "step" element, and I strongly encourage you to do so for the sake of consistency:
- Plane payload&fuel when starting the mission (define as total or percentage to have a relative payload to the plane abilities).
- Weather on the start location of the mission.
Fuel: we defined the fuel capacity for each tank. We define the total fuel as 50% percentage of the max allowed fuel in each tank.
Payload: we define the payload as 16% percentage of the total allowed payload.
Weather: Using the weather element, we defined a calm weather. Clear skies, no wind, rain or turbulence. We define the center of the weather area to be on same coordinates as our starting point, that way it will take effect immediately on start of the mission.
As of this writing on XP10.10b6 the "cloud layer 0" does not behave as expected (See weather in the designer guide).
To conclude the first "step", we have defined the first "goal" the simmer needs to reach, the scenario in which the simmer will fly- weather and payload. Now, we can move to the next "step" and the last one too, which asks the simmer to land on EDNV airport.
<!-- Second step: Land at EDNV airport -->
<step id="2" name="ednv" next_step="end" >
<step_goals>
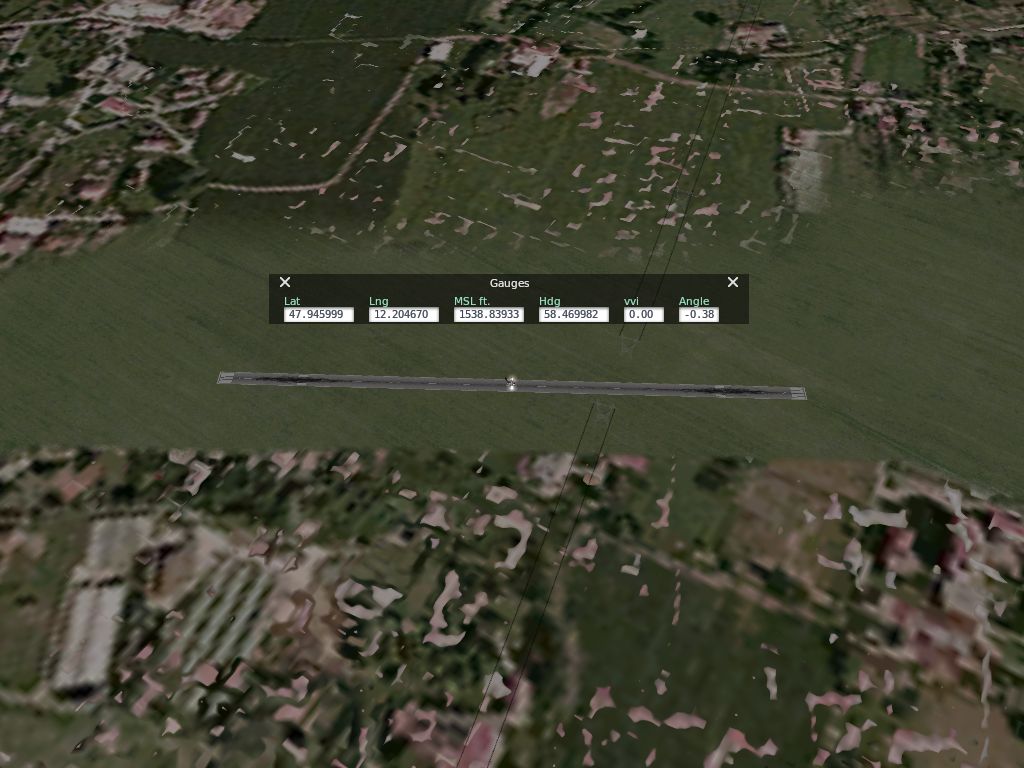
<static_target id="1" lat="47.945999" long="12.204670" elev_ft="1539" need_to_land="1" success_distance_nm="0.8"
success_elev_relative_ft="0" />
</step_goals>
<step_settings>
<step_desc>
<![CDATA[Continue eastwards from LOIK airport, and follow the river north until you reach the end of the valley.;Once there, head to EDNV airport and land there to complete the flight plan.;;Good Luck;]]>
</step_desc>
</step_settings>
</step>
<step id="2" name="ednv" next_step="end" >
<step_goals>
<static_target id="1" lat="47.945999" long="12.204670" elev_ft="1539" need_to_land="1" success_distance_nm="0.8"
success_elev_relative_ft="0" />
</step_goals>
<step_settings>
<step_desc>
<![CDATA[Continue eastwards from LOIK airport, and follow the river north until you reach the end of the valley.;Once there, head to EDNV airport and land there to complete the flight plan.;;Good Luck;]]>
</step_desc>
</step_settings>
</step>
As you can see, the second "step" is much simpler and shorter. There are no weather definitions or weight changes. All we need is to define is the target coordinates and the rules to accomplish the "step". In this step, the simmer needs to land at the EDNV airport, while the radius for success is 0.8nm (should be enough). The description part explains in simple and clear instructions how to accomplish this objective.There are no special restrictions this time.
The last element that is missing to conclude the "mission" part is the closing "step".
The closing "step" is always named "end" and it is a "step" the simmer does not need to fulfill, it is there because of plugin design.
The rules for the closing "step" are:
The simplest way to create it, is to copy the last "step" you defined, modify the step name to "end", remove all targets except for one and rewrite the description part to reflect the designers last words for the simmer.
Here is an example of the closing "step" for our tutorial mission:
The last element that is missing to conclude the "mission" part is the closing "step".
The closing "step" is always named "end" and it is a "step" the simmer does not need to fulfill, it is there because of plugin design.
The rules for the closing "step" are:
- Its name is always: "end"
- It just need the "step_goals" element with one dummy target (just copy from last step) and "step_settings" with step_desc" to display the "ending" message in the briefer widget.
The simplest way to create it, is to copy the last "step" you defined, modify the step name to "end", remove all targets except for one and rewrite the description part to reflect the designers last words for the simmer.
Here is an example of the closing "step" for our tutorial mission:
<!-- Closing Objective: after landing in EDNV airport -->
<step id="9999" name="end" next_step="" >
<step_goals>
<static_target id="1" lat="47.945999" long="12.204670" elev="1539" needToLand="1" success_distance_nm="0.8"
success_elev_relative_ft="0" />
</step_goals>
<step_settings>
<step_desc>
<![CDATA[You have ended the tutorial.;Hope you enjoyed it.;;Written by Snagar;]]>
</step_desc>
</step_settings>
</step>
</steps>
As you can see, the Closing "step" is a copy of the last step( step name "ednv"). We modified the step name and description. All other information is skipped by the plugin, but we still need their presence ( <step_goals> and <static_target> elements ).
We can now close the Mission file with the following line:
</MISSION>
Our Skeleton Mission is complete.
We can copy the snippet of codes to a simple editor, and save it under the missionx/data directory with the extension of ".xml".
For example: "Tutorial01_v200.xml".
Open X-Plane and test your build. Check if the plugin can load the file, do some simple tests to check if the steps are accomplished correctly.
After we test the skeleton mission, it is time to add more options to make the mission flow better.
In this part of the tutorial we will add Feedbacks to the simmer. One feedback will be triggered after the plane passes LOIK airfield. the second feedback will be when the plane reaches the end of the valley and the last feedback will be triggered when plane will reach ~8nm from EDNV airfield. This will make the simmer more aware of his surrounding, since the airfield is not that big and quite hard to find.
Since all Feedbacks are on the second step, we will add all new info under it.
First, Modify <Targets> Element of "second" Objective:
<step id="2" name="ednv" next_step="end" >
<step_goals>
<static_target id="1" lat="47.945999" long="12.204670" elev="1539" need_to_land="1" success_distance_nm="0.8" success_elev_relative_ft="0"/>
<!-- just after LOIK airfield -->
<static_target id="2" lat="47.564991" long="12.127969" elev="3000" need_to_land="1" success_distance_nm="1" success_elev_relative_ft="5000"
optional="1" />
<!-- end of valley -->
<static_target id="3" lat="47.758482" long="12.130899" elev="3000" need_to_land="1" success_distance_nm="2" success_elev_relative_ft="5000"
optional="1" />
</step_goals>
Secondly, Add Feedbacks that are linked to the targets, through the "target_id" attribute.
<step_feedbacks>
<broadcast id="1" target_id="2" distance_to_Broadcast="4" ><![CDATA[Remember to follow the river north.]]></broadcast>
<broadcast id="2" target_id="3" distanceto_broadcast="3" ><![CDATA[You are nearing the end of the valley. Remember to head ~4 degrees to reach EDNV airfield.;You can use the local map too.;]]></broadcast>
<broadcast id="3" target_id="1" distance_to_broadcast="8" ><![CDATA[You are nearing EDNV airfield;]]></broadcast>
</step_feedbacks>
There is more then one way to broadcast message to the simmer. In this tutorial I use the simplest technique which is easy to understand and implement. On other tutorials, we will change the broadcast and use a more sophisticated element.
In a nutshell, We need to define a message trigger relative to location. The locations are only defined under the step_goals element. You can see that I added two "static_target"s that are optional. This is crucial, since optional means the simmer does not need to reach them in order to complete the "Step", but we need them to help us define relative triggering points.
Finishing Words
That concludes our first tutorial.
I hope that this tutorial will easy your path in mission creation. It does take some time to get use to it, but there is no reason to hurry and use advanced techniques before you understood the basics.
Remember, do a short research on the mission locations, keep your mission file indent and clean from unneeded comments. Use the designer Guide, it will help validating your syntax. Test your mission in order to verify its behaviour.
If in any case you got stuck, you can e-mail me.
( If you find mistakes, any kind, please kindly e-mail it to my mailbox )
Snagar
